Skip to end of metadata
Go to start of metadata
If you’re manually planning your school bus routing schedules, there’s no way for you to be fully confident that the data you’re seeing is accurate and up-to-date. When disparate systems house your important student and driver data, the daily management of your school bus routes is, in a word, stressful.

Manually managing this data for school bus routing is also time-consuming, inefficient and costly to your school district.

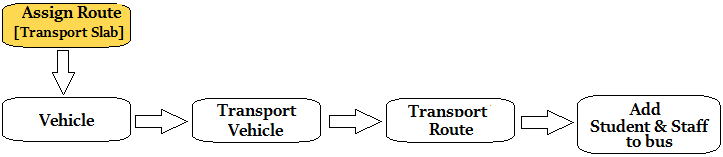
School Admin Transport Manager assists the users in managing the Vehicles, Routes, assigning students and staffs, tracking the capacity of each vehicle.

  1. Track Vehicles
  2. Track Routes
  3. Track student / staff are in which Bus.
  4. In emergence assign another vehicle in situation of vehicle break down.
  5. Send school reached and left SMS, even in emergency the school can send SMS to parents. This will avoid ambiguity.


To manage Transport, follow the below steps:

  1. Assign Slabs in Student Slab - Creating Fee Slabs and Students Information - Student Slabs.
  2. Create Vehicle in Vehicle Masters- Vehicle.
  3. Create Transport Vehicle - Transport Vehicle.
  4. Create Transport Route - Transport Route.
  5. Assign Transport Vehicle for students and staff  - Assign Transport Vehicle to Student and Staff.
  6. Generate Report - Transport Manager Reports

Note:

  1. Routes will be added as slabs initially when the students are added. Please refer how to create and assign Transport Slab for students Creating Fee Slabs and Students Information - Student Slabs.


Step 1: Go to Transport Master, Click on Vehicle Menu

Step 2: Once you click on vehicle menu under Transport masters, vehicle master will be opened as shown below.

click on Add button to add new vehicle. In the Vehicle table it will show all the vehicle previously created.

Step 3: Once you click on  (plus) Add,  Add/Edit Vehicle window will be shown as below

In the Add / Edit Vehicle Details dialog, you need to provide the details as show in the screen.

  1. Enter the Vehicle Name.
  2. Enter the Reg No. and Vehicle Model. Its not mandatory, for any specification you can enter the information.
  3. Select the staff who is in charge to drive respective vehicle.

Finally, Click on Add button to create a vehicle. Once the data is saved you will see a Vehicle Successfully added message. Repeat the above steps to add all the Vehicle in your School. Once all the vehicle are added click on Close button to close the Add/Edit window.

The Vehicle Master will look as shown below.

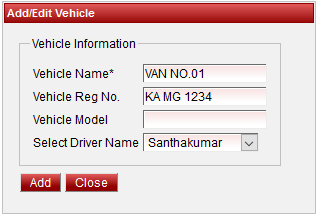
Edit or Delete a record

You can edit and change the added record by clicking on Edit icon in Action column.

You can delete the record if created duplicated or not required by clicking on delete icon   in Action column.

Note

You will not be able to delete Vehicle once you assign  Transport Vehicle.


Labels
  • None