Skip to end of metadata
Go to start of metadata

How to Issue TC (Transfer Certificate) to a student?


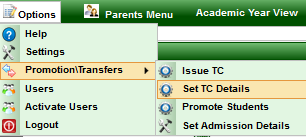
  1. On top right there is a tab OPTIONS, click on that you will find following options.
  2. Click on Promotions/Transfer tab.

Under Promotions/Transfer, choose Issue TC.


On clicking Issue TC tab, a page will be displayed as shown below.


    • Choose class, section and click on Find Button.
       All the students of that class will be displayed.
    • If you want to issue TC to the all the students in the class, select all – Has Furnished Certificates and Has Students Transferred (as shown below).
    • Click on update button.


    If you have to assign TC to a particular student alone, you can choose Student from drop down and click on Find button

How to set TC details?


  • TC details can be set under set TC details once after issuing TC.

          Like, current school leaving date, promotion date, TC application date, Medium (English/ Kannada/ Hindi etc…)

  • If you have given TC to all the students of a class (For Example: 10th grade) or many other students of different class, you can set a common data for all the fields globally and update.

  1. Under OPTIONS tab, In Promotion/Transfers, click on Set TC Details

2. On clicking Set TC Details, Global TC Setting for Current Academic Year page will be displayed (As shown below).


  • Set Current School Leaving Date of the student(s).
  • Set Promotion Date of the student(s).
  • Set TC Application Date, i.e. date on which TC was applied.
  • Enter Medium (of education).
  • From Paid fees drop down, select YES if Fee is paid and NO if fee is not paid.
  • From Fee Concession drop down, select YES if you have given fee concession and NO if fee concession is not given.
  • Select TC Issued date.
  • Enter Total School days, i.e. total working days.
  • Choose from drop down Character and Conduct of the student.


Once after entering all TC details globally,

  1. Select class and section (select student, if you want to view a particular student).
  2. Check box View saved data.
  3. Click on Find button.

   A list of all the students to whom the TC is given for the selected class and section will appear with saved TC details, you can edit/enter TC details and click on update button.


If you want to view all the students to whom TC is issued irrespective of class or section,


  • Check the box show all students.
  • Click on Find button.

List of all the students of all the class to whom TC is been issued will be displayed with the globally set TC details.

Click on Update button to set Global TC details to all the students.


 If you wish to edit certain fields for particular students, you can manually edit it and update.

 If you have entered TC details in Student Information --> students --> TC details, then those details will appear for that particular student if view saved data check box is selected.

  •  If view saved data check box is not selected then it will take globally set TC details.

e


Alternate approach to issue TC:


There is another way to issue TC apart from the one demonstrated earlier.


You can follow this approach when you have to issue TC to one or two individual students.


Go to Students Information --> Students


  • On clicking Students tab, a page will be displayed with following fields as shown below.


  1. Select Class, Section & Student to whom TC has to be issued.
  2. Enable TC tab check box.
  3. Click on Find button.

  • On clicking Find button, details of the selected student will be displayed as shown below.


  • Click on edit button.
  • On clicking edit button, a page will be displayed with TC details as shown below.


  • Enter all required TC details.
  • Click on Student's History tab.
    On clicking Student's History tab following page will be displayed.

  • Enter Current School Leaving Date (dd/mm/yyyy) and Current School TcNo (compulsory).
  • Check box Has Furnished Certificates, If TC is issued.
  • Check box Has Student Transferred, If student is Transferred.
  • Finally, click on update button.
Labels
  • None